
Using VLANs with VMWare on a Linux Desktop
UPDATE: I have written an easier, more robust guide that leverages NetworkManager and nmcli.
I enjoy capture the flag competitions, and it’s a good practice to operate in a clean virtual environment. I would like the CTF VM to be in it’s own VLAN, but I’m cheap and don’t have server hardware. Let’s learn how to create virtual network interfaces on Ubuntu Desktop (20.04), and create vlan-bridged vmnets in VMWare Workstation that can be assigned to virtual machines.
Configuration
Pre-Requisites
Before doing this, you’ll need to already have a network set up that has fully functioning VLANs in place on the routers and switches. Additionally, the connection to the desktop you’re working on will need to have a VLAN trunk link. This link must support all the tags you anticipate having virtual interfaces for on the desktop. For example, if you anticipate the desktop host operating on VLAN 10 and your virtual machines in VLAN 20 and 30, you’ll need to ensure your desktop’s network link is a trunk link supporting VLANs 10, 20, and 30.
NOTE: This guide assumes you are using Ubuntu 20.04, but that is not a strict pre-requisite. This procedure likely works on other recent versions of Ubuntu and other similar Linux distributions that are using systemd-networkd.
Configuring the Host
First, install the necessary software and kernel modules.
We’ll want to load the 802.1q (8021q) kernel module to our current boot as well as the modules file for persistence.
sudo apt install vlan
sudo modprobe 8021q
sudo su -c 'echo "8021q" >> /etc/modules'
Next, we need to configure our desktop to use systemd-networkd instead of the default NetworkManager. We do this by enabling and disabling the applicable services in systemd, and modifying the netplan. Additionally, we’ll make sure systemd isn’t waiting for our network to boot up. Last, we’ll configure our system to use systemd-resolved as our DNS cache. [1]
sudo systemctl disable NetworkManager
sudo systemctl unmask systemd-networkd
sudo systemctl enable systemd-networkd
sudo systemctl disable systemd-networkd-wait-online.service
sudo sed -i 's/renderer: NetworkManager/renderer: networkd/' /etc/netplan/01-network-manager-all.yaml
systemctl enable systemd-resolved
ln -sf /run/systemd/resolve/resolv.conf /etc/resolv.conf
Creating Virtual Desktop Inferfaces
To create the virtual interfaces, we need to create a few files in /etc/systemd/network/.
Each virtual interface will need a file represending it’s virtual device, and another representing it’s network configuration.
We’ll also need one additional one for the host network configuration (assuming you have one physical interface).
As in the earlier example, we’ll pretend that our host resides in VLAN 10, and our virtual machines will be in VLAN 20 and 30.
You don’t have to, but I prefer to prefix the files with the physical interface.
You can get this via ip addr and finding your eth# or enp#s# interface, or just using the commands below to automate it.
Both as a placeholder, and to make things easier if you’re just copy/pasting, I’ll refer to the host physical interface as $IFACE from here on.
Here’s all the files we’ll be making:
IFACE=$(ip route get 8.8.8.8 | awk '{ print $5; exit }')
sudo touch /etc/systemd/network/$IFACE.network
sudo touch /etc/systemd/network/$IFACE.20.netdev
sudo touch /etc/systemd/network/$IFACE.20.network
sudo touch /etc/systemd/network/$IFACE.30.netdev
sudo touch /etc/systemd/network/$IFACE.30.network
# Touching everything isn't really necessary, but this might be helpful to visualize the logical connection between the files.
Next, we’ll configure each network device file and applicable network configuration file according to our desired network setup. Again, this will be written for easy copy/pasting, but please modify this according to your needs. 😉️ These next copy/pastes are destructive, so don’t test this in live environments where you already have configurations.
For our first configuration, $IFACE.network let’s set up the network for the host physical interface.
We’ll specify host to identify the interface ([Match]), use DHCP for the network options, subinterfaces, and finally the RouteMetric.
We need to specify the metric so that it takes priority in routing decisions. This defaults to 1024 and the lower the metric, the higher the priority.
echo "[Match]
Name=$IFACE

[Network]
DHCP=yes
VLAN=$IFACE.20
VLAN=$IFACE.30

[DHCP]
RouteMetric=1000" | sudo tee /etc/systemd/network/$IFACE.network
Following that, we need to begin configuring our subinterface network device files. We’ll specify what to name the devices, attach them to a VLAN, and identify which VLAN they are attached to.
for i in {20,30}
do echo "[NetDev]
Name=$IFACE.$i
Kind=vlan

[VLAN]
Id=$i
" | sudo tee /etc/systemd/network/$IFACE.$i.netdev
done
Last but not least, we’ll specify how to configure each device’s network. In my case, I’m using DHCP, which makes this configuration short and simple.
for i in {20,30}
do echo "[Match]
Name=$IFACE.$i

[Network]
DHCP=yes
" | sudo tee /etc/systemd/network/$IFACE.$i.network
done
Restart the service (or reboot, if you find you have remnants of old configs), verify everything operational/routable [1] and you’re ready to begin configuring VMWare!
sudo systemctl restart systemd-networkd
networkctl
Creating VMWare Virtual Networks
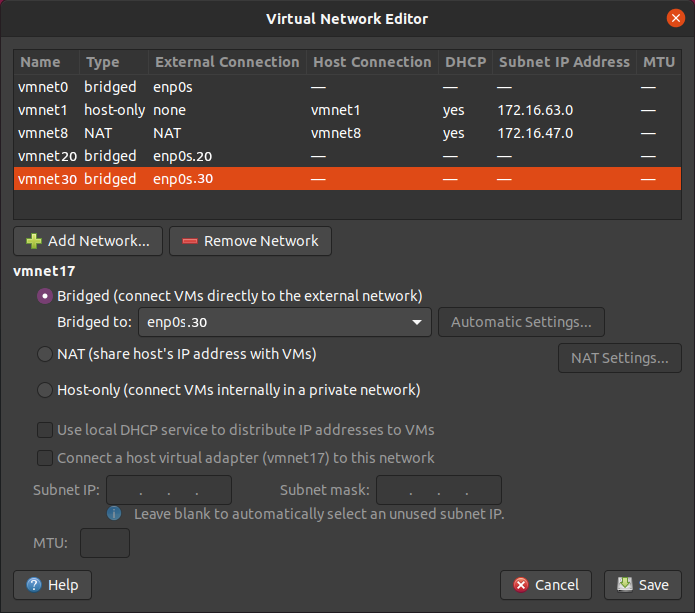
Start by opening up the VMWare Virtual Network Editor.
You can open it through the desktop GUI or via sudo vmware-netcfg.
If you’re using VMWare Player, check out the Caveats section for a workaround.
If you haven’t edited anything, you’ll probably have three vmnet# interfaces already made.
vmnet0 is an interface that is bridged to all other interfaces on your host.
You’ll want to start by selecting vmnet0, and changing the device that it is bridged to from Automatic to your host $IFACE of the physical device.
Next, begin adding networks (e.g. vmnet 20) for each of your vlans, setting them to Bridged and bridging them to the appropriate virtual interface (e.g. $IFACE.20).
Working With Virtual Machines
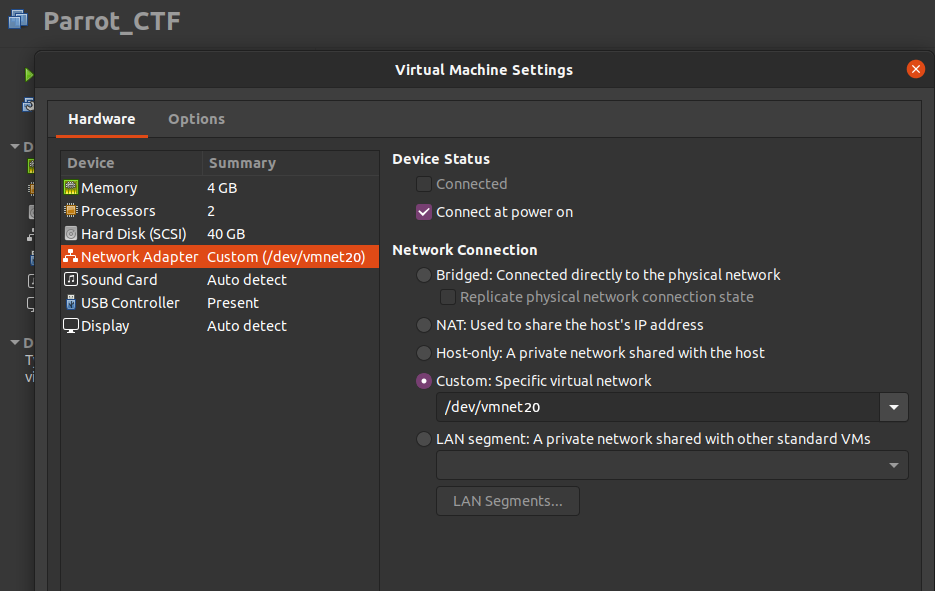
To assign a VM to one of your new virtual networks, just assign a network adapter to one of the VMNets you created in the custom section.
Caveats
What does this do for security?
I’ll be honest, this is a bit of a double-edged sword. For your virtual machines, it allows you greater control over network resources by ensuring the VMs are placed into an appropriate VLAN. This can be very helpful in the event your virtual machine is compromised, restricting, maybe even isolating the attacker in your desired network space. However, your host machine is now operating on a network trunk link. If your host were to ever be compromised or (less likely) an attacker were able to escape a VM up to the host machine, they now have access to every VLAN on your trunk, unimpeded by any semblence of network segmentation. This may be an acceptable trade-off for some, as the risk of a VM compromise may be higher than a host compromise.
What if I have VMWare Player instead of VMWare Workstation?
cd /usr/lib/vmware/bin

ln -s /usr/lib/vmware/bin/appLoader vmware-netcfg

ln -s /usr/lib/vmware/bin/vmware-netcfg /usr/bin/vmware-netcfg
After creating these links, you should be able to access the VMWare Virtual Network Editor. [2]
References
-
Credit to @majorhayden for their Creating a bridge for virtual machines using systemd-networkd guide. I wasn’t aware of
systemd-resolvedand thenetworkctlutilities before finding their post. -
Michael Gr. contributed a clever fix to the Debian documentation. This should allow users of VMWare Player to use the vmware-netcfg utility.